# 模板语法相关
- 如果香港用别的分隔符来代码 {{}},可以通过 Component 元数据中的 interpolation 选项来配置插值分隔符;
- 模板语句(绑定函数)不能引用全局命名空间的任何东西。例如 window 或 document,也不能调用 console.log 或 Math.max;
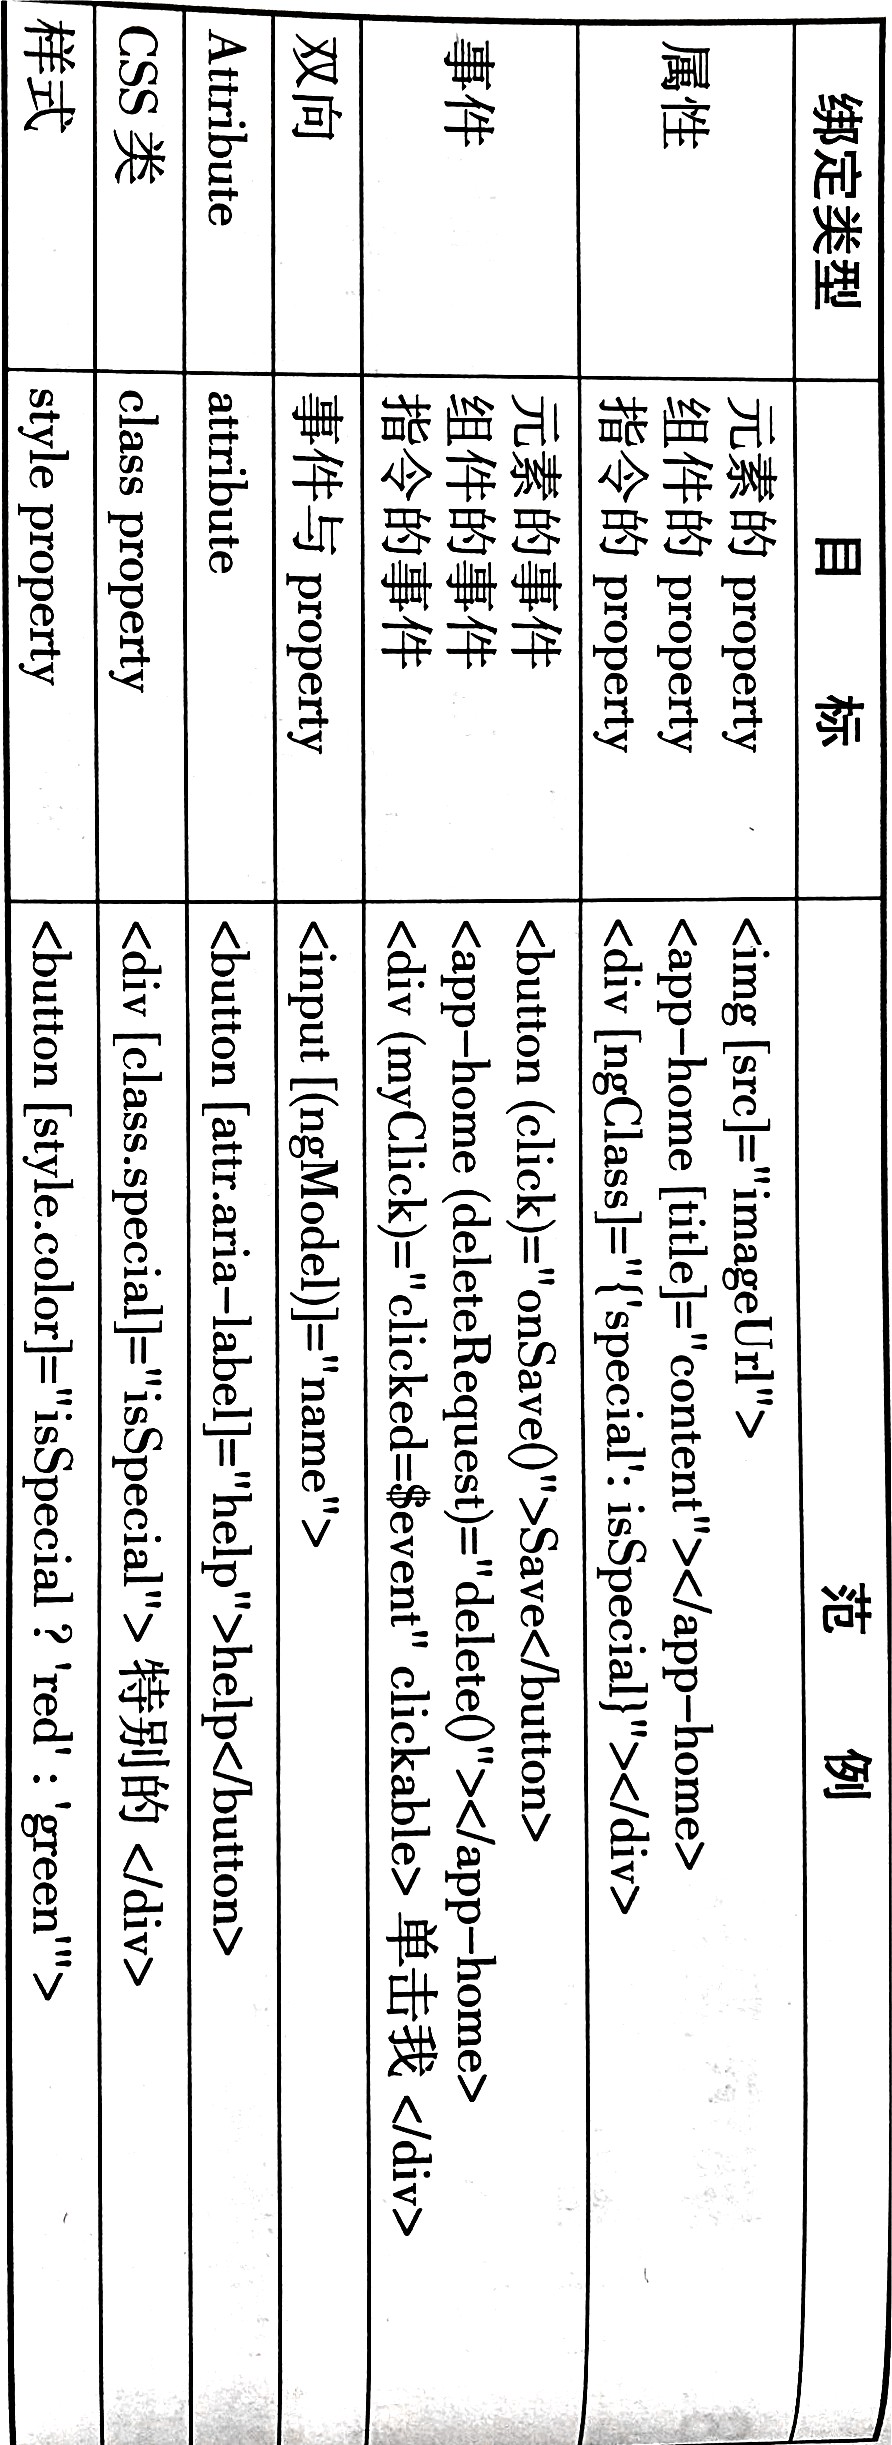
- 属性绑定:
[disabled] = "isUnchanged";
- $any 转换函数可以将表达式转换为 any 类型:$any 表达式可以防止 typescript 编译器在类型检查时报错说 date 不是 item 对象的成员。
<p>时间:{{$any(item).date}}</p>
# 组件相关
- 类似 v-html;将属性绑定到
[innerHTML] = "data"; - 父组件向子组件传值:
- 传递属性
// 父组件
<app-header [title] ="title"></app-header>

// 子组件
export class HeaderComponent implements OnInit {
  // 接收父组件传递过来的值
  @Input() title: any
}
- 传递方法
// 父组件 get 是一个方法
<app-header [get] ="get()"></app-header>

// 子组件
export class HeaderComponent implements OnInit {
  // 接收父组件传递过来的方法
  @Input() get: any

  // 定义一个 getFun 方法,接收 home 组件的 get 方法
  getFun() {
    this.get
  }
}
<button (click)="getFunc()"></button>
- 传递整个组件
// 定义 home 属性;this 指的是整个 home 组件
<app-header [home] ="this"></app-header>

// 子组件
export class HeaderComponent implements OnInit {
  // 接收整个父组件
  @Input() home: any

  // 可以直接调用父组件的数据或者方法
  getDate() {
    console.log(this.home.title)
  }
}
<button (click)="getFunc()"></button>
- 父组件通过 @ViewChild 主动获取子组件的数据和方法
在父组件挂载子组件时,定义一个 id,使用 ViewChild 获取 DOM 节点的方式获取子组件:

```tsx
// 父组件
<app-footer #footer></app-footer>
// 然后在 component 引入 ViewChild
import { Component, OnInit, ViewChild } from '@angular/core'

@ViewChild('footer') footer:any

// 定义方法获取子组件中的数据
getDate() {
  console.log(this.footer.message)
}
# 指令相关
- ngSwitch
<div [ngSwitch]="myVar">
  <div *ngSwitCase="'A'">变量是 A </div>
  <div *ngSwitCase="'B'">变量是 B </div>
  <div *ngSwitDefault>变量是其他</div>
</div>
- ngStyle
修改指定 DOM 颜色:
- 使用
[style.<cssProperty>]=value的形式
<div [style.background-color]="'yellow'">
  背景色为黄色
</div>
注意这里的双引号里面加单引号,如果不加,会找这个 yellow 的变量。
- 使用 ngStyle 属性,即使用键值对来设置每个属性。
<div [ngStyle]="{ 'background-color': 'red', 'color': '#fff' }">
  背景色为黄色
</div>
- ngFor
获取索引:
<ul>
  <li *ngFor="let item of cities;let indexValue=index">
    {{indexValue+1}}-{{item}}
  </li>
</ul>
- ngNonBindable:不会进行模板语法的编译
<div>{{content}}</div>
<div ngNonBindable>{{content}}</div>

<!-- content 变量 -->
public content:string = `<h1>标题</h2>`
渲染结果:
<h1>标题</h2>
{{content}}
- 自定义指令
- 创建 hide-node 指令。输入命令:ng g directive directives/hide-node
- 配置 hide-node.directive.ts:
// 导出指令的模块
export class HideNodeDirective {
  // el 代表当前的元素
  constructor(el: ElementRef) {
    // 设置当前元素隐藏
    el.nativeElement.style.display = 'none'
  }
}
- 在模板中使用自定义指令
<div appHideNode>
</div>
# 转换数据的管道
- date 日期转换管道
<p>时间{{today | date:'YYYY-MM-dd HH:mm:ss'}}</p>
- number 小数位转换管道
接收的参数形式如下:{最小整数位数}.{最小小数位数}-{最多小数位数}
<p>{{decimals1 | nuner: '3.2-4'}}</p>
- json 对象序列化管道
<p>{{this | json}}</p>
- slice 管道
用来截取字符串或则数据的内容:
<!-- message = beautiful -->
<p>{{message | slice:6:9}}</p>
<!--结果为 ful -->
如果想将一个对象以 json 显示在页面:
<p>{{jsonObject | json}}</p>
- 管道可以串联使用
<p>{{time | date | uppercase}}<p>

<!-- fullDate 为 date 的参数,前面说到的格式 -->
<p>{{time | date: 'fullDate' | uppercase}}<p>
- 自定义管道
定义一个 clamp 的管道:ng g pipe pipes/clamp
创建完成后,需要在根模块中进行引入:
import { ClampPipe } form './pipes/clamp.pipe'

declarations: [
  ClampPipe
]
内容:
import { Pipe, PipeTransform } from '@angular/core';

@Pipe({
  name: 'clamp'
})
export class ClampPipe implements PipeTransform {

  // value 为原数据,min、max 为参数
  transform(value: any, min: number, max?: number): any {
    if (max === undefined) {
      max = min;
      min = 0;
    }

    // 返回与元数据相乘
    return Math.min(max, Math.max(value, min));
  }

}
如果选择将管道注入 inject 类中,则必须将管道包含在 NgModule 的 provides 数组中。
# 路由相关
路由的相关对象
# router 对象
Router 对象的获取,可以进行函数式编程导航:
import { Router } from '@angular/router';
 constructor(
    private viewerSerivce: ViewerService,
    private httpService: HTTPConfigService,
    private messageService: NzMessageService,
    private router: Router
  ) {}

  // 导航到新页面
  this.router.navigate(['./home'])
# ActivatedRoute
ActivatedRoute 保存着路由的参数、路由地址等,一般用来接收路由参数,用法跟 Router 一样,先引用,实例化对象。
首先在跳转路由的时候添加参数:
<a [routerLink]="['/news']" [queryPerams]="{id: 1}">news</a>
在 new.component 组件中获取 id 值:
import { ActivatedRoute } from '@angular/router'
  constructor(
    private routeInfo: ActivatedRoute
  ) { }

// 获取 id
this.newId = this.routerInfo.snapshot.queryParams['id']
# 路由守卫
可以通过下面这些钩子在不同场景进行拦截路由:
- CanActivate:处理导航到某个路由的情况。
- CanDeactivate:处理从当前路由离开的情况。
- Reasolve:在路由激活之前获取路由数据。
# CanActivate
用来处理导航到某个路由的情况,当不满足守卫条件时,无法导航到指定的路由。如下例子:
import { CanActivate } from '@angular/router'

export class LoginGuard implements CanActivate {
  canActive() {
    // 模拟是否登录
    let value: boolean = Math.random() < 0.5
    if (!value) {
      console.log('用户未登录')
    }
    return value
  }
}
配置一个 contact 路由,先把 LoginGuard 加入 provides,再指定路由守卫。canActivate 可以指定做个守卫,值是一个数组:
{
  path: 'contact',
  component: ContactComponent,
  canActivate: [LoginGuard]
},

@NgModule({
  imports: [RouterModule.forRoot(routes)],
  exports: [RouterModule],
  providers: [LoginGuard]
})
# CanDeactivate
厉害时候的路由守卫,提醒用户执行保存操作后才能离开。CanDeactivate 接口一个泛型,指定当前组件的类型。CanDeactivate 方法的第一个参数就是接口指定的泛型的组件,根据这个要保护的组件的状态,或者调用方法来决定用户是否能够离开。
import { CanDeactivate } from '@angular/router'
import { ProductComponent } from '../component/product.component'

export class UnsavedGuard implements CanDeactivate<ProductComponent> {
  // 第一个参数,泛型的组件
  // 根据当前要保护组件的状态,判断当前用户是否能离开
  canDeactivate(component: ProductComponent) {
    return window.confirm('还没保存,确定要离开么')
  }
}
同样先加入 provides,再配置路由:
{
  path: 'contact',
  component: ContactComponent,
  canActivate: [LoginGuard],
  canDeactivate: [UnsavedGuard]
},

@NgModule({
  imports: [RouterModule.forRoot(routes)],
  exports: [RouterModule],
  providers: [LoginGuard, UnsavedGuard]
})
# service 相关
非父子组件之间通讯,通过 service 的方式进行通讯,首先进行创建服务,然后注册到模块中。根模块的 providers 是模块所需要的的服务列表。
# DOM 操作
可以在 ngAfterViewInit 生命周期函数中操作 DOM。可以通过原生 JS 和 ViewChild 装饰器两种方式来操作 DOM。
- 原生 JS 操作 DOM
可以在 ngAfterViewInit 生命周期函数中使用原生 JS 操作 DOM。
export class HomeComponent {
  constructor() {}

  ngAfterViewInit() {
    // 获取 box 节点
    let box = document.getElementById('box')
    console.log(box)
  }
}
- 使用 ViewChild 操作 DOM
使用 ViewChild 操作 DOM,首先需要给 DOM 节点取一个名字,格式为 “#” 加上名称,如下:
<div #box></div>
获取:
import { Component, ViewChild } from '@angular/core'

export class NewsComponent {
  // 获取 DOM 节点
  @ViewChild('box') myBox

  ngAfterViewInit() {
    console.log(this.myBox.nativeElement)
  }
}
# 模块和懒加载
# 自定义模块
命令:ng g module module/user,这只是创建一个 user.module.ts 的模块文件,还可以创建一个根组件:ng g component module/user
如果其他模块想要使用,需要把 user 组件暴露出来,在 user.module.ts 中使用 exports:[] 来实现:
import { UserComponent } from './user.component'
// 暴露组件,让其他模块里面可以使用暴露的组件
exports: [
  UserComponent
]
然后需要将自定义的模块在根组件中进行引入并注入:
import { UserModule } from './module/user/user.module'
// 引入并注入组件
imports: [
  BrowerModule,
  AppRoutingModule,
  // 注入 user 模块
  UserModule
],
如果在其他模块中需要使用自定义模块中的子组件,在自定义模块中,也需要通过 exports 来导出自定义模块中的子组件。
# 配置路由模块懒加载
在创建模块的时候,可以在命令后面加上 --routing 用来配置路由,就会生成对应的配置路由的文件。
ng g module module/user --routing
首先在自定义的模块中,引入对应的根组件:
// 引入 user 模块的根组件
import { UserComponent } from './user.component'

// 配置模块根组件路由
const routes: Routes = [
  {
    path: '',
    component: UserComponent
  }
]
在项目根组件中配置路由。这里动态挂载自定义模块中的组件,不需要再引入组件了,只需要在 app-router.module.ts 中配置:
const routes: Routes = [
  {
    path: 'user',
    loadChildren: ['./module/user/user.module#UserModule']
  }
]
其中 #UserModule 是模块根组件的具体类名。loadChildren 是延迟加载子模块。
项目相关 →